Sunday, August 24, 2008

My attempts at free spirit quilting

Every six months, six dear quilting friends and I join about 45 other women for a quilting retreat hosted by The Country Quilter in Somers. It is always an enjoyable weekend of quilting, eating, laughing and sleeping (and in that order... we quilt and eat more than anyone could imagine) in a Connecticut country inn. Many nights we don't leave our machines until 2am in the morning, only to be up, dressed, fed and back sewing by 8am.

I have been enjoying these retreats for about 5 years and during the last 2 years have decided to make Friday night a freeform, create something, quick, easy and fun type of evening. My only two requirements are no pattern, and it must be able to be made and quilted before 10am Saturday morning.... Think about it, create an idea, choose fabrics, design, piece/applique, baste and quilt a nice wall hanging between 5pm Friday and 10am Saturday, leaving time to eat, laugh and sleep. Well, here are a few of the results... Let me know what you think....

I call this one Shimmering Circles... it is inspired by a Ricky Timms piece and to be honest it was the first one made on these Friday night freeforms..... and when I finished, I realized it wasn't really original... sorry Ricky! I used Superior Thread metallics and love the way the quilting shimmers in the light...


The next is called Curly Cues and for me has no rhyme or reason. It is based on an image I remember seeing somewhere at some point, but I think in my dreams. It is quilted with a variegated brown and orange thread and all the applique is raw edge. It hangs in my basement in my quilting studio.


The one I made at the last retreat was inspired from seeing photos on one of those HGTV design shows. It was a picture carried over across four picture frames. I liked the idea of a collage that was really one piece. Making this piece I received a lot of interesting comments from the other quilters at the retreat. First they mentioned the circle theme I had going..... (a theme I hadn't even realized, except as you look at these three quilts, you can see the circles... oh well). Next, once I had the piece quilted, they were all amazed I was actually going to cut it up. Many called me 'brave'! Saturday night at Show 'n Tell, I told everyone that I didn't think it was quite brave to be able to cut up something I had made in 6 hours... they just chuckled :-)

The only problem with this piece that my husband named "LP's and 45's", because it reminds him of old records, is that I am going to have it hang them separately. Otherwise, as you see in this picture, they just slide back together on the rod, no longer showing the clear delineation of the three pieces. Oh well, quess I will have to find a new home for it.


Ok, that's it for today... hope you enjoyed seeing my lighter side .... these 3 pieces did teach me a bit in composition and now I am working on a much more complicated piece, but totally originally and oh yes, still circles. I will share that one as I make more progress...

Enjoy your day... Cheers!

Renee

Friday, August 22, 2008

I had a play date with George!

I am soooo excited! Last night I went to my friends house to play with George. No, Bob (my DH) doesn't have to worry, George is the APQS longarm machine that is a sit-down model. Well, maybe Bob does have to worry... oh well, more on my DH later.

Anyway, Mary Anne got a George APQS Longarm quilter last week and baby it is SWEET! The speed, the sewing quality, the QUILTING SPACE!!! Oh my gosh, talking about going to heaven! Think about never having to scrunch your quilt up into a 5" space right of the needle! George has a full 20" space to the right of the needle and then the side curves, so the quilt just glides right up the side and gently folds over. For those of us used to machine quilting, there is really no learning curve like with most longarms. You still move the fabric, not the machine like the stand-up models and George comes with it's own table that has plenty of room for your quilt to rest on, so you aren't pulling at it. The table is something like 60" x 36"..... no more flinging the quilt over your shoulder as you sew... or putting a card table next to your sewing machine to catch your quilt.

Even Bob asked when I walked in the door gleaming... ok, so when is George arriving? But unfortunately, I still have 2 college tuitions to pay, so for at least one more year, I will have to live thru Mary Anne.... but listen to me, if you have a friend that has a George, go play!

It is WONDERFUL!

Hugs!

Thursday, August 21, 2008

Come see where I quilt!

Ok, so now that you have seen some of my quilts, take a look at where I quilt.... Wait a minute. maybe I should say, where I have been quilting for the last 1 1/2 yrs. I think like many of you, I had to carve out a place to quilt initially. Some use the kitchen table, some an old desk no longer needed by their kids, others it is a card table put up and taken down as required. For me it was my dining room table. At first my husband was a little surprised to see me set up shop right in the middle of our formal dining room. A room we used quite frequently as I like to entertain and have a large family. So as you can imagine, it meant I was always packing my stuff away and taking it out whenever I wanted to sew. But believe me, someone always noticed a thread in the corner or on the chair cushion! It was also a chore selecting fabrics for a project, because my stash was in boxes and crates in the basement... so the steps became my friend... at least when I wasn't too tired and decided to use whatever was upstairs and out in the open. Believe me, I got good at finding innovative places to store fabric and my quilting tools..... the cutting mat went behind the china cabinet, the rulers went on the top shelf of my buffet server... you get the picture!

So after a few years I began talking about fixing up the basement so I could at least sew down there and have everything in one room. My house is 104 yrs old and the basement was dark, dingy and damp... not the best environment for making inspiring fabric art! So, for a good 5 years I talked about it. My husband would shake his head and ask why spend money on a place to sew... but then he would add... if that's what you want, go ahead. So I finally did it, I saved my pennies, and now I have a great quilting space... oh yeah, we turned the front half into a TV room, so the whole family benefited and my husband and I can be in the same room while I quilt and he watches his big screen TV. Anyway, take a peak at my pictures and see where I spend my time (I even work from home a lot, so the desk is a great spot for my laptop).


Here is an overview, so you can see how I have created a sewing triangle.... sewing table, ironing board and cutting island all in one area. The son of one of my Pelham Quilters quild members made all the quilting furniture to size to fit the space. Am I lucky, or what! Notice, that the quilting table has a large space to the left of the machine and behind for quilting large projects, without having it falling on the floor. The sewing machine is set in the table (with a custom inset) so that the quilt doesn't get caught on the edge of the machine when I free motion quilt.

With the swirl of my chair I can easily iron as I work, without getting up.


Then behind my chair is my cutting island. I love this piece! It is on wheels and just the right height so that I don't have back pains when I am cutting a large amount of fabric. The island is 48" x 36", so I have an oversize cutting mat and keep my rulers in a wood stand right on top. All the shelves hold two large baskets where I keep my fabric, each drawer is color coordinated, so my blues are with my blues, greens with greens, etc... It even has an opening in the center. On one side, I keep my thread boxes and odd shape tools, and on the other side I can stand up bolts of fabric. I get empty bolts from the quilt shops so I can keep any piece that is 3 yds or more. Oh yeah, the drawers in the table hold all my gadgets, batting and patterns.


Then on the wall to the left of the cutting table is my storage bench. You can see all my books in the middle and the smaller baskets hold my fat qtr collection. I made a cushion for the top and it adds a nice seating area in my space.
On the next wall going around the room (opposite my sewing table) is my desk. I made this myself out of a file cabinet from Staples, two table legs from my local lumber store and a slab of granite from the local stone and marble yard... I couldn't be picky about the color or size as it was an end piece at a great discounted price :-).


So that is where I quilt. Maybe my next post will be some more recent quilts made in my new space. Hope you enjoyed the visit!


Cheers!

Renee
a.k.a. Ranunculas

Wednesday, August 20, 2008

Let's get acquainted!

I am going to post some of my quilts. They range from my early work (I started quilting in 1999) to about 2005.

This is a twin size quilt I made for my son Robert, a few years ago, when he decided he wanted a racing themed room, painted fire station RED. The back is a black and white checker fabric, like the facing flags!


A raggedy flannel quilt made for my daughter Raven, to snug up under while she reads. She even took it to picnics in high school and uses it still in college. She said of all the quilts I have made for her, it is the one all her friends try to steal! I had to make a second for my niece Janelle!


My first and probably last attempt at a hand applique project, at least one this size! I took a class with Sharon Wren at The Country Quilter in Somers, NY. Lovely shop and great teacher. I love the process, as it is great as I travel, but it took quite awhile to complete. I did echo quilting in each square using a smoke nylon thread. It really worked out very well. Sorry my photography is off, but at the time it was hanging in my upstairs hallway, and I was standing on the stairs.


This quilt was made by my Senior Girl Scout troop. The last three girls had been together since Brownies and were raising money to help offset the cost of a Cruise paid for almost entirely by years of selling Girl Scout cookies! The girls had never quilted before, but I think they did a fine job on the top. I later machine quilted it, and we raffled it amongst the troop leaders in our community.


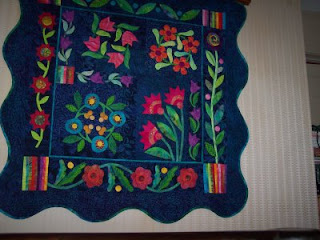
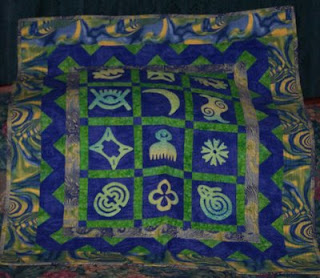
OK, these pictures are out of order (I am just learning how to add photos to this blog)... but here are two from a class I took with Elizabeth Rosenberg at The Country Quilter. She taught a series of classes from the book 'Quilt Inspirations From Africa'. This is one of my pieces. You will see others below. The top photo is the center of the one below. I made this quilt with the intentions of keeping it for myself, but my brother-in-law kept after me to sell it to him, so I finally gave in. Alas, it was destroyed when a fire swept thru their home Christmas Eve of 2006. Of course, they lost everything, but as most quilters can imagine, after the shock set in, my thoughts went back to this quilt. Thank the Lord, they were safe and I have these pictures!


Another quilt from the series with Elizabeth.


This was the first class Elizabeth did in the series. I took it as a way to learn how to machine applique (up until this class all my quilts were tradition blocks... boy has that changed!). My mother loved it so much, I made one for her dining room wall as well. (I wish I had done that with the quilt my brother-in-law got :-)).


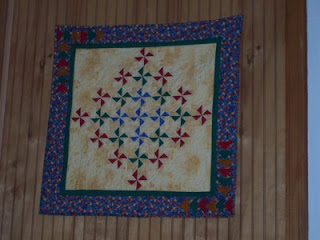
This is a small wall hanging made with fabrics from the Quilt Makers Gift Collection. It is quilted with free motion pinwheels and was one of my earlier quilts.